
Let me start by saying that I have zero photography skills, I've never taken a class, and the camera I use is a regular Canon one that is 6 years old. Despite being a novice, I still get what I consider to be a good picture every now and then, and they can usually still use a little perking up. Even photos that seem hopelessly bad can be transformed into decent pictures with photo editing.
With that said, I highly recommend editing your photos using Picnik. This free online photo editing program can turn a so-so picture into a great picture! Many of you have probably used Picnik, but for those who have not used it yet, allow me to demonstrate how it works. Get excited because it is simply AMAZING! And it is so easy to use!
Let's start with this photograph...
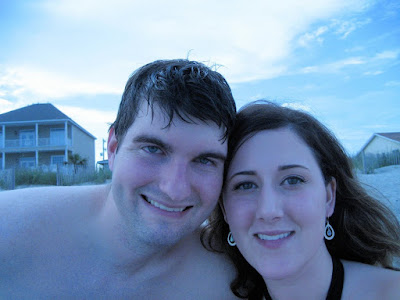 It's me and the husband at North Myrtle Beach in South Carolina. I like it, but it's umm...a little blue. I think we can do better, folks!
Step 1: I usually start by changing the exposure levels. (FYI: There is an Edit and a Create tab - start in Edit.) I adjust the exposure first, bringing more light to my photo. I add contrast next.
How much exposure and contrast you ask? It just depends on each photo - you have to play around with it. Be careful not to add too much exposure, however, because it can make your photo look grainy.
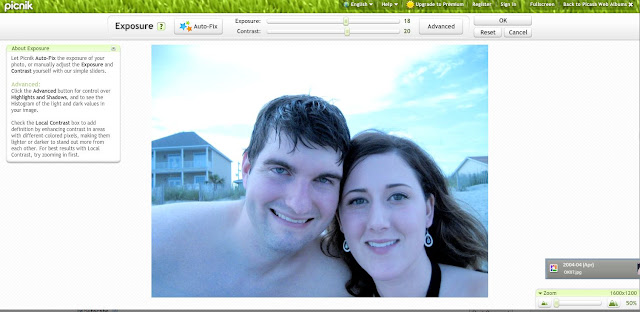
Step 2: For pictures with natural light, I usually adjust the temperature to get rid of this bluish tint I always seem to get. The temperature setting (still in the Edit tab) will nip that problem in the bud. It begins at 0. If you slide the scale to the right, it makes the picture warmer (think reds, golden yellows, etc.). Sliding it to the left makes it cooler. For this picture, I made it warmer, as you can see below. The saturation scale is also a good one to use if your picture seems faded. I didn't need it in this case.

Step 3: Next, use the eye brightening tool (located under Touch-Up in the Create tab) to make eyes stand out more. It initially deepens and darkens the color, so I also adjust the lightness scale as well to allow the natural eye color to show through. The fade scale makes it so that you can choose how dramatic you want the eye brightening to be. Increase the fading if you want only a subtle brightening effect.
You can't see it in the screen shot below, but this feature is super simple to use. You adjust the size of the circle to fit your eye and click. That's it. :)

(Let me say that eye brightening is actually one of Picnik's paid membership features, and let me tell you - I think this feature alone is worth the $24.99/year. But there are still lots of great free features in Picnik, so don't let that keep you from trying it. I used it for about 3 or 4 months before I bought a 1-yr membership.)
Step 4: Add mascara. Say whaat?! It's not what you think. It won't add false eyelashes or anything. It basically just sharpens and defines the area around the eye. So you will want to do this for not just women but men, dogs, and children too (or not, if you're worried about it). For a more natural look, you can lessen the strength. This tool is located under Touch-Up in the Create tab.

Step 5: Use the focal soften tool (located under Effects in the Create tab). This feature is great because you can make the subject of your photo stand out more by softening and blurring the background.
Select the area you want to focus in on - in this case, it's our faces. Adjust the blur scale to soften and blur everything outside of that circle. I think it's easy to go overboard with this feature (guilty!), so it's best to do a little bit at a time almost to where it's unnoticeable. You can always go back and add more focusing later.

Step 6: Lastly, I decided to add a little more warmth to the picture by going back to Temperature under the Edit tab.
 Yay! We're done!
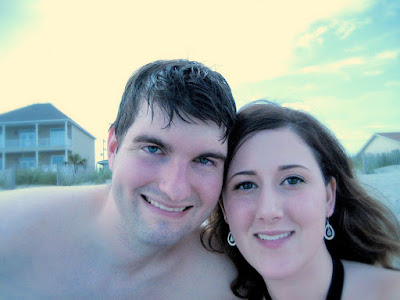
Drumroll please....
BEFORE
AFTER
Okay, so the fun doesn't end there. Click to see more photo editing after the jump....
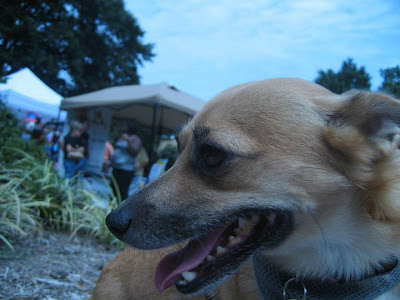
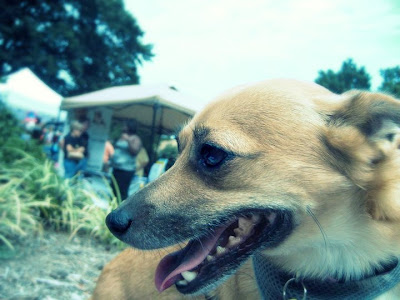
Now onto a second picture, one with my Jini. I'll try to make this short.
Step 1: Add exposure and contrast.

Step 2: Add a cross-process effect (under Effects in the Create tab). This is one of my favorites, and it's also free. It adds an interesting color to the photo. Try it - you won't be disappointed. (But if you are, you can always click the "undo" button in the top right-hand corner.)
 Now look at that happy little girl! (PS - Her teeth were terrible when I took this pic. She has since had her teeth cleaned by the vet.)
Step 3: Add focus using the soft focal tool (under Effects in the Create tab).

Step 4: Brighten the eyes (under Touch-Up in the Create tab).
 I think it makes a huge difference!
Step 5: Add mascara and define the eyes (under Touch-Up in the Create tab).
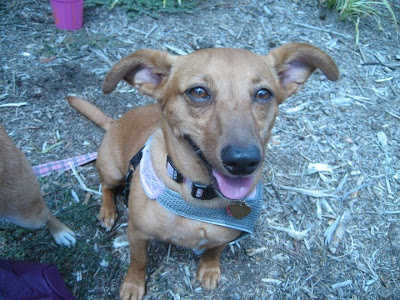
 Now for the best part...
BEFORE
AFTER
 What a sweet baby girl! Love my Jin Jin.
Here is a before and after of my other sweet baby girl Heidi:
BEFORE
AFTER

Got to love the cross-process effect, right? I have been going crazy with it.
Here are some other before and after pics...
BEFORE
(Wrightsville Beach, NC)
AFTER

AFTER
BEFORE

AFTER
BEFORE

AFTER
Thanks for looking! I hope this inspires you to edit your photos too :)
Select the area you want to focus in on - in this case, it's our faces. Adjust the blur scale to soften and blur everything outside of that circle. I think it's easy to go overboard with this feature (guilty!), so it's best to do a little bit at a time almost to where it's unnoticeable. You can always go back and add more focusing later.

Step 6: Lastly, I decided to add a little more warmth to the picture by going back to Temperature under the Edit tab.

Drumroll please....
BEFORE
AFTER

Okay, so the fun doesn't end there. Click to see more photo editing after the jump....
Now onto a second picture, one with my Jini. I'll try to make this short.
Step 1: Add exposure and contrast.

Step 2: Add a cross-process effect (under Effects in the Create tab). This is one of my favorites, and it's also free. It adds an interesting color to the photo. Try it - you won't be disappointed. (But if you are, you can always click the "undo" button in the top right-hand corner.)

Step 3: Add focus using the soft focal tool (under Effects in the Create tab).

Step 4: Brighten the eyes (under Touch-Up in the Create tab).

Step 5: Add mascara and define the eyes (under Touch-Up in the Create tab).

BEFORE

AFTER

Here is a before and after of my other sweet baby girl Heidi:
BEFORE

AFTER

Got to love the cross-process effect, right? I have been going crazy with it.
Here are some other before and after pics...
BEFORE
(Wrightsville Beach, NC)
 |
| Not bad, not bad... |
 |
| ...but this is even better! |
BEFORE

AFTER
 |
| Look at those adorable little paws in the sand |

AFTER
 |
| Staring out the window |

AFTER
 |
| aww...baby girl |
Thanks for looking! I hope this inspires you to edit your photos too :)


Pin It
I love using Picnik! But I seldom use cross-process. Wonder why? Your pics look beautiful - maybe I'll try it again.
ReplyDeleteI just discovered Picnik last week! It is a blast to use! I did not, however, know about cross-process. I will definitely be trying it out. Thanks for the info ☺
ReplyDeleteThank you so much for posting this! I have not "played around" in Picnik at all but you have given me confidence to at least try some effects.
ReplyDeleteIt makes such a difference when you take the time to edit photos! Thanks for the lesson :)
ReplyDeletei need to learn all about this stuff! thanks for sharing! i need to print this page :)
ReplyDeletefound you at tutorial tuesday on hope studios :)
I actually use Picnik, but I must say that you've given me a ton of ideas and is the best tutorial that I've found online! Thank you so much. I'm your newest follower stopping by from the Lettered Cottage.
ReplyDeletehttp://SallyLeeByTheSea.com
Hi Lauren! I use picnic also. Thanks for the sweet comment you left me and you have a very lovely family.That little doggie is just soo sweet. Becareful today in NC! I hope we dont have to bad of storms.
ReplyDeleteOmg! Your baby girl looks just like my chiweenie! I have to send you a picture!
ReplyDeleteThank you for this! I didn't know how to use the focal soften tool and know I do. Your pic. looks great!
ReplyDeleteI forgot to ask...how do you take screen shots?
ReplyDeleteHi Cole! Thanks for your nice comment! :)
ReplyDeleteYou can take screen shots by simultaneously holding down the shift + print screen button on your keyboard. On my keyboard, print screen is on the Home button. This essentially copies the image displayed on your screen. Then, go to a basic editing program like Paint and paste it into the program and save as a .jpg or .png file.
Hope that helps!
Lauren
You have such a cute blog :) Don't you just Looove Picnik?!! So many fun options. Great tutorial.
ReplyDeleteDelighted Momma
This is fantastic and helpful post, thanks for the share.
ReplyDeleteBuy law essays